In a previous blog, we discussed how to remove scratches from your car quickly. The method discussed, however, only catered for shallow and simple scratches. For the sake of being holistic, here’s how you can remove scratches from car deep edition.
Remove Scratches from Car with Sand Paper
First, let us start with some basics. Your car’s paint is divided into three or four layers (five layers according to some). The bottom-most layer, which is the layer that makes contact with your car’s metal body is called the primer and usually doesn’t take the colour of your cars body. Above that layer is your base coat which is the colour of your car. Then you have the clear coat which is the glossy covering that protects your base coat. Finally, there’s the wax layer, which obviously only exists on cars that have been waxed.
Usually, with most scratches, it’s only the clear coat that gets damaged, and luckily that’s the thickest layer. So, to resolve that, levelling the jagged scratched area will remove the scratch from your car. But it will also make your clear coat layer thinner. That is why it becomes important to wax your car at the end of this process, to ensure the now thin clear coat layer is protected with another layer.
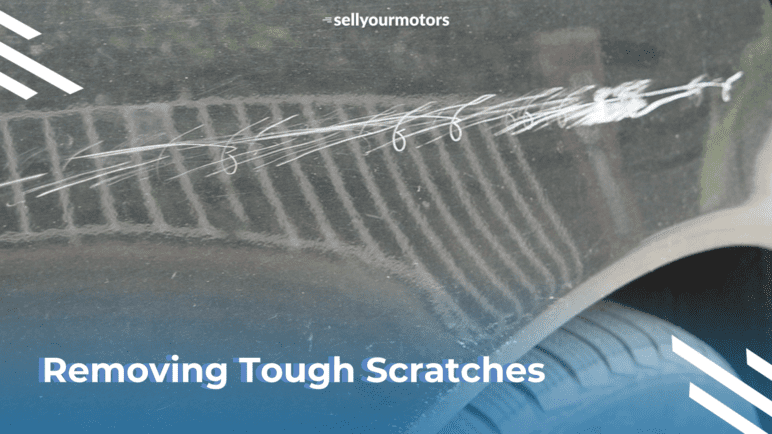
Note that his process won’t work for a scratch that is deeper than a clear coat scratch. How do you distinguish how deep your scratch is? Grab a spray bottle with soapy water (dilute liquid detergent with tap water) and spray the scratched area, if the scratch becomes hard to see due to the water running over it then it is a clear coat scratch. If not, and the scratch is still apparent while there is water above it, then the scratch has gone beyond your clear coat.
If you feel that sanding your car body is unnecessary because the scratch or scuff isn’t that deep, then refer to the quick scratch removal guide linked at the beginning of this blog.
Step 1
Clean the scratched area with soapy water and a towel. Just as was the case with the toothpaste method discussed in the previous blog, this step removes any dirt and debris laying around. This step is especially important with this technique as it involves sanding and waxing in later steps – both being steps that can cause damage to your cars body if the dirt and debris is left on the surface before proceeding.
Step 2
Apply a strip of tape a half-inch above the scratch, and another strip a half-inch below. The lengths of these tape strips should be as long as the scratch, and so they should start where the scratch starts and end where it ends. The finished scene should look like an equal sign with the scratch sandwiched between the two lines. If your scratch is vertical then the tape straps should also be vertical, and the equal sign made to be vertical as if were two identical towers erected in close proximity to one another.
Step 3
Sand the area with sandpaper. Ideally, you should use 5,000 grit sandpaper and 3,000 grit. Start by running your thumbnail down your car and through the middle of the scratch. If your thumbnail gets caught in the groove of the scratch quite noticeably, then you want to use the heavy-duty 3,000 grit sandpaper to cater for this deep scratch. If you feel the scratch isn’t that deep then use the lighter abrasiveness 5,000 grit sandpaper.
Now start sanding in a motion perpendicular to your scratch. So if your scratch runs horizontally from left to right, then you want to sand in a vertical upward and downward motion. If the scratch is vertical then sand in a horizontal motion.
You can wrap the sandpaper on a kitchen sponge so that the bottom and top parts of the sponge are covered by the sandpaper. You will now use the curved part of the sandpaper to sand the scratch. The sponge serves as a shape holder for the sandpaper and it ensures that equal pressure is being applied to the area to be sanded. This is of course opposed to using your fingers varying pressures through the sandpaper, on the area to be sanded which will produce an uneven job.
Now spray some soapy water onto the scratched area and a little on the rough side of your sandpaper ( which is now wrapped around a sponge). Then start to sand the scratch in a pattern perpendicular to it. In the case of a horizontal scratch start at the left side and proceed to the right side. With a vertical scratch start from the top and proceed to the bottom. Do this for about 15 seconds and then grab a towel and dry the soapy area to see if the scratch has been removed. If it’s still there, wet the area again and go for another round.
What will remain is a hazy area between the two tape straps that has been sanded. Now move the tape straps and stick them further apart than they were initially. You can use new tape straps for this. Now you want to use the 5,000 grit sandpaper (if you aren’t already to fade out the hazy area with the surrounding areas (mostly the area where the old tape straps used to cover). Spray soapy water on the surface and sandpaper and this time start sanding in a circular motion. Start at the hazy area and then move to the areas where the first pair of tape straps used to be. After that dry the sanded area with a towel.
Lastly, you want to use some scratch removing wax. Before proceeding with this step make sure that your intended area is absolutely clean of any residue. Any residue could be harmful to the polishing process. Grab a (preferably) microfibre towel and apply the polish directly onto the towel. Next, start to rub the towel onto the area in a circular motion. Make sure to extend well over the hazy area (or sanded areas) by a little amount. Add some more polish to the towel if you feel the area is still hazy. Once it looks good enough grab a clean towel and start to buff the polished area.
The final step is to wax the polished area and preferably the whole car. Learn how to do that by through our how to wax your car guide.
Remove Scratches from Your Car and Sell it to Sell Your Motors
If you’re reading this for the purposes of prepping your car for sale, then you’re in the right place. Located all over UAE, Sell Your Motors is a car buying specialist that buys your car directly from you in only 30 minutes.
Try our free online car valuation and receive a call from us, or call us directly on 04 330 1030